Monday, 29 February 2016

Get Aadhar card | Get E-Aadhar Card Online Get Aadhar On Mobile

Get aadhar Card, Get E-aadhar card Online:
Get e-aadhar card

Normally people can get aadhar card letter through post, with in 90days period after completion of aadhar enrollment process. People can get aadhar original copy through posts only. Incase people didn’t get aadhar letter on that time they can get e-aadhar card through online from the official aadhaar card website page (https://resident.uidai.net.in/get-aadhaar), people can download their electronic version of aadhaar card (e-aadhar card), and it e-aadhar card is as Valid as the original aadhar letter, and people can get aadhar card or get e-aadhar card by submitting the aadhar number or Enrollment ID, Enrollment ID can found on Enrollment Slip, enrollment slip given to you at the time of aadhar card Enrollment.

  • Get Aadhaar card
  • Get E-aadhaar card Online /Download e-aadhar card
  • Get aadhar card on Mobile
  • Check aadhar card Status Online

Get E-Aadhar or Download E-aadhar card:
You can download your E-aadhar card from the e-aadhaar card Downloading page of aadhar uidai official website (https://eaadhaar.uidai.gov.in/), by entering the mandatory fields  which is marked as star (*),  we have two options on the E-aadhar card downloading page  is  Download or Get E-aadhar card with Aadhaar card Number, Download or Get E-aadhaar card with Enrollment ID, before Downloading e-aadhar card you need to checkyour Aadhar card Status online

If you Select getadhar card by Enrollment Id
In the Enrollment ID field you have to enter 14 digits of Enrollment ID and 14 digits of date and time of Enrollment like as (1234/12345/12345 dd/mm/yyyy hh:mm:ss)
Then you have to enter

Your Full Name: ………………………………………

Pin Code………………………………………………….

Enter security Image code: XXXX

Mobile Number: 9951XXXXXX

If you Select getadhar card by Aadhaar card Number
In the Aadhaar card Number field enter 12 digits of your aadhar card like as (1234 1234 1234)
Then you have to enter the same fields

Your Full Name: ………………………………………

Pin Code………………………………………………….

Enter security Image code: XXXX

Mobile Number: 9951XXXXXX

NOTE:  before Download or Get E-aadhar card  you should register your mobile number with your aadhar card  In case you didn’t  register  your mobile Number with your aadhar card at the time of enrollment you don’t have permission to get E-aadhar card online, so for Download e- aadhar card you need to Register your mobilenumber with your aadhar card

After entering mobile number you have to click on Get One Time Password

Then you will get OTP on your register Mobile Number,

After entering the OTP click on Validate & Download

Before Downloading E-aadhar card you need to install adobe reader on your System,

After Downloading E-aadhar card Enter your area POSTAL CODE as Password to Open the E-aadhaar card on your System.

Get Aadhar card Number on Mobile:
 To get Aaadhar card Number on Mobile, you have to login on aadhaar card official web page (https://resident.uidai.net.in/web/resident/get-aadhaar-no),

Then you have to fill the mandatory

In the Enrollment ID field you have to enter 14 digits of Enrollment ID and 14 digits of date and time of Enrollment like as (1234/12345/12345 dd/mm/yyyy hh:mm:ss)

Then enter your Register mobile Number 10 digits Number (9951XXXXXX)

Then enter Security Code

Click On Get OTP

You will get OTP on Your Register Mobile Number, it will valid for some time only
After getting OTP, Enter OTP on the next page
Now You can get Aadhar card Number on Your Mobile, after process completion ..


Monday, 22 February 2016

What is Pahal Scheme | Pahal Scheme Benefits And Pahal Meaning

What is Pahal Scheme and benefits, Pahal meaning in English, Telugu, Tamil and Hindi


What is Pahal  Scheme and benifits

The PAHAL DBTL ambitious scheme was earlier launched on June 1, 2013 by the previous Government with the objective of giving cash subsidy on cooking gas and it covered 291 districts. The present government has comprehensively examined the PAHAL scheme and after reviewing the problems faced by the consumers, it modified the prior scheme and re-launched it in 54 districts on November 15, 2014 to cover 2.5 crore households.

The second phase of this revised scheme started on January 1, 2015 to cover all the districts of the country. Under the previous scheme, it was mandatory to have the Aadhar number for all consumers who want to receive the LPG subsidy. However, this was a big problem for consumers who did not have the Aadhar card, which meant that they could not avail the subsidy.

How to receive LPG subsidy?
However, the new scheme has made available the LPG subsidy to all consumers. Under the modified scheme, the consumers who use LPG can now receive subsidy in his bank account under two options. Such a consumer who joins the scheme will be called Cash Transfer Compliant (CTC) and he can receive subsidy in the bank account.

Option 1
With Aadhar: If the consumers have their Aadhar numbers, then they have to get the number linked to the bank account to receive the subsidy.

Option 2
Without Aadhar: If a consumer does not have his Aadhar number, he can get the subsidy by linking his bank account with the LPG connection ID. This can be done in two ways:
The LPG distributor should get all bank details (account holder’s name, account number, and IFSC code) of the consumers who want to get LPG subsidy from his location. All information will be captured in the LPG database.
The bank should have all the information of the LPG connection of the consumer. This includes the 17 digit LPG consumer ID.
While the first option is known as the primary option, the second option is referred as the secondary option.  In fact, the primary option of having an Aadhar number is the best option to avail the subsidy and hence recommended to all.
Now, those consumers who have already registered themselves under the previous scheme need not register their information again with the LPG distributors. They will receive their subsidy directly in their bank account.

Benefits of PAHAL
There are three bodies which are going to be benefited by the PAHAL scheme:
For LPG consumers: All consumers using LPG cylinders will get cash subsidy to buy 12 14.2-kg cylinders or 34 5-kg refills. The amount of money which is equal to the difference between the present subsidised rate and the market price is automatically transferred to the bank account of the consumer, when he or she makes the first booking for a cylinder. However, this is possible only after joining the scheme. When the consumer takes the delivery of the cylinder, another advance subsidy is transferred to the bank account.
For Government: This scheme will reduce or prevent the unauthorised sale of LPG cylinders at higher rates. The purchase of multiple gas connections will be prevented. Accordingly, the subsidy burden for the Government will be reduced.
For oil marketing companies (OMC): The LPG gas distributors won’t have much burden of sending the cylinders to the intermediate gas suppliers. They will be in direct contact with their consumers, thereby building a good customer relationship. Multiple unauthorized connections won’t be provided. The OMCs will be able to ensure that the consumers receive the LPG gas at one fixed rate and do not have to stand in long queues if they had made the booking well in advance.

Grace period
Those consumers who are not yet in the CTC bracket will be given 3 months time from the date of launch of PAHAL to become CTC. During this period, such consumers will need to buy the LPG cylinders at the market rates but they will receive the subsidised amount in their bank account once they become CTC consumers.

Parking period
After the grace period of three months, all non-CTC LPG consumers will get another three months time as Parking Period. In case a consumer does not become CTC during this period, the parked subsidised funds will lapse and consumer shall become ineligible to receive subsidies till the consumer becomes CTC. When non-CTC consumers become CTC after the parking period, they will get one time permanent advance and total cash subsidized cylinders in that financial year.

Permanent advance
Once a consumer becomes a CTC after joining the PAHAl scheme, a one-time advance will be given to him or her. This is known as the permanent advance and will remain fixed for a financial year. This amount will remain with a CTC consumer till the time he has the gas connection. LPG consumers who have the permanent advance on a previous scale will not be paid for any extra payment on account of the revision in the permanent advance.

Things to remember
All consumers need a bank account to join the scheme.
One time permanent advance will be received by the consumers in their bank account, before they buy the first market priced LPG cylinder
The subsidies will be debited to the consumers’ bank account according to their entitlement of subsidized cylinders.
The consumers who have joined the scheme will get cylinders at subsidized price for three months from November 15, 2014 to February 14, 2015.
The consumers will get LPG cylinders at market price for the next three months, but the subsidy amount will be given back to them if they join this scheme before April 14, 2015.

Check Aadhar Linking Status Online resident.uidai.net.in

How to Check Aadhar Linking Status

Aadhaar Linking Status

Aadhar card holders must have to check aadhaar linking status, with which organizations to link your aadhaar card,People have to link your aadhaar card to bank account, Voter Id, LPG connection, Driving licences.  The entire Bank has launched the facility for linking Aadhar number with your bank accounts. on official aadhaar uidai page
After registering for the Linking your Aadhar number to your bank Account, check the status of the Linking your Aadhaar number with your bank Account
The following are the fields are entered to check the status of the Linking your Aadhar number with your bank Account through Online:

Step-1: Enter the 12 digit Aadhar Number in the Text Box

Step-2: Enter the Security Code in the Text Box which is given in the Captcha Image

Step-3: Click on the Button Verify

Step-4: You will receive the SMS to the registered Mobile Number

 The following are the fields are entered to check the status of the Linking your Aadhar number with your bank Account through Offline:

For any query or complaint, you can contact through any of the means provided below:
Telephone Number: 1800-300-1947 (Toll-free)
Fax: 080-2353 1947

(OR) we can contact to the Bank Toll-free Number

If You can not link with any account from here you can link your Aadhaar card Number  to Link your Bank account , and link your aadhaar number to LPG Connection


Sunday, 21 February 2016

How to Link Aadhar Card Number to LPG Connection Online

How to link aadhar Number to my LPG connection

link aadhaar number to LPG Connection

It is important to update your-aadhaar-card to LPG-connection". Update Aadhaar card Details to Indane/Bharat/ HP LPG Connection Aadhaar Indane/Bharat/ HP  LPG linkage for Subsidy via Online/Offline/SMS/IVRS It is important to update your aadhaar card details to your LPG connection for subsidy.

This process is done after linking aadhaar card to bank account. If you want to know the process of linking aadhaar number to your Indane/Bharat/ HP  LPG connection, this post will surely help you.
We have listed the step by step procedure to link your Indane/Bharat/ HP /Bharat/ HP Gas connection details with aadhaar card using the online mode as well as via offline mode. You can make use of any of the methods listed below i.e choose from Online Method, offline method, IVRS method and SMS method.  
  • Link Aadhar Card Number to LPG Connection -Offline mode
  • Link Aadhar Card Number to LPG Connection through Online
  • Link Aadhar Card Number to LPG Connection – IVRS Method
  • Link Aadhar Card Number to LPG Connection – SMS Method 

Option-1: Link Aadhaar Card to Indane/Bharat/ HP LPG Connection - Offline Mode (Manual Application Form Filling)
Before starting the process, the following documents should be ready
  • LPG Pass book for entering the Consumer Number
  • Aadhar card for entering the Aadhar card Number
  • Application form to fill

The Following is process to fill the Application:
  1. Take the print out of the Application or take the application form
  2. Fill the details which are Mandatory
  3. Enter the LPG ID or Consumer Number
  4. After filling the form, submit to your nearest LPG
  5. After submitting the application, the LPG will give you the acknowledgement
  6. The form will be verified by LPG
  7. After verifying, your card details will be updated successfully

 Option-2: Link Aadhaar Card to LPG Connection - Online Mode
The Online process link to Aadhar with the LPG is easy and fast way to get the process done
The following are the steps to be followed for the online application

Step-1:  Enter your address location, by selecting the state and District from the drop down

Step-2: Choose the Benefit Type, by selecting the Benefit Type and Scheme name from the drop down

Step-3: Enter your details like, Email Id, Mobile Number and Aadhar Number. Email-id and Mobile Number should match with the details which are given in Aadhar

Step-4: Click on Submit Button

Step-5: After clicking the Submit button, you will receive the OTP to your registered mobile Number and email-id

Step-6: Enter the OTP and click on the Submit button


Step-7: After clicking the submit button you will receive the Acknowledge number to your register Email-id and Mobile Number for the further reference

Option-3: Link Aadhaar Card to LPG Connection – IVRS Method
The following are the steps to be followed for the IVRS method

Step-1: In LPG pass book, you can see the call number of the particular LPG

Step-2: Call to the toll-free number of that LPG and follow the instructions as per consumer

Option-4: Link Aadhaar Card to LPG Connection – SMS Method
The following are the steps to be followed for the SMS method
IOC < STD Code + Distributor’s Tel. Number ><Consumer Number >

 Now people may get aware of How to link Aadhar card Number to My LPG connection, through various modes, Consumers may choose any of one mode to link Aadhar card Number to LPG connection, after completion of this linking process, Consumers can check aadhar linking status 

How to link aadhar number to my bank account

How to link aadhar number to my bank account

link aadhaar number to bank Account

It is easy to link your aadhar card number to bank account, in some simple steps. Aadhaar is a 12-digit unique identification (UID) number which the Unique Identification Authority of India (UIDAI) is issuing for all Indian residents who are enrolling for the same.
The entire Bank has launched the facility for linking Aadhaar number with your bank accounts.

Benefits of Aadhaar Linked Bank Accounts:
Linking your Aadhaar number with your bank Account lets you:

• Have a single financial address for government subsidies

• Receive direct credit of LPG subsidy from Government into your account

• Receive direct credit of other Govt subsidies like welfare funds, pensions, scholarships, MNREGA wages etc. into your account

How to link aadhar number to my bank account
There are six options to link the aadhar to my bank account

Option-1:
• Walk into your nearest Bank branch
• Fill up Resident Consent Form to link your Bank Account with your Aadhaar number, carry original Aadhaar Card & a copy.
•Click the link available to download a copy of the resident consent form.
• Register your Bank Account Number with the Government Agency for Direct transfer of benefit

Option-2: Through ATM
Question: How to link aadhar number to my bank account through ATM
• Insert Debit card
• Click on the Registration
• Enter PIN
• Click on the Link Aadhaar No.
• Select Account
•C lick on the Update
• Enter Aadhaar No.
• Re-enter Aadhaar No.
• Click on the Confirm.

Option-3: Through Internet Banking
Question: How to link aadhar number to my bank account through Internet Banking
• Login using Internet Banking credentials
• Click on the “Aadhar Seeding” Link for Registration
• Registration page will open
•Fill up the Form to link your Bank Account with your Aadhaar number
• Click on the Submit Button
• Then it will display the message that, Aadhar Number is linked to your Bank account

Option-4: Through Phone Banking Center (PBC)
Question: How to link aadhar number to my bank account through Phone Banking
•Call on PBC Toll Free Number
•Authenticate on IVR using Debit card/Customer ID 
• Follow the rules as per the PBC

Option-5: Through SMS
Question: How to link aadhar number to my bank account through SMS
•Aadhaar <Aadhaar No.>AC <last 6 digits of A/C no.> to 5676782

Option-6: Through Branch Approach
•Fill up the Resident Consent Form to link your Bank Account with your Aadhaar number, carry original Aadhaar Card & a copy.

•Submit the Application form along with the self-attested copy of the Aadhar card

From the Above Steps people can easy to link aadhaar card number to your bank account, in some different ways

Searches related to how to link my aadhaar with bank account
how to link my aadhaar with bank account online
how to link my aadhaar with sbi bank account online
how to link my aadhaar with icici bank account online
how to link my aadhaar with axis bank account online
link my aadhaar card to bank account online
how to link aadhaar with hdfc bank account
how to link aadhaar with pnb bank account
how to link aadhaar with bank account online bob

Saturday, 20 February 2016

Aadhaar complaints to Grievance center File complaint

Aadhaar complaints to Grievance center

http://www.eaadhaaruidai-gov.in

Following are the requirements to contact the grievance center:

1) The users of this system are expected to be residents, registrars and enrollment agencies.

2) Any resident seeking enrolment is given a printed acknowledgement form with an Enrollment 

Number, that enables the resident to make queries about her/his enrolment status through any communication channel of the contact center.

The following are the fields are entered to fill the File Complaint Application:

Step-1: Enter the Enrollment Id in the Textbox which is Mandatory for the Aadhar related Complaint

Step-2:  Enter the full name as same as available on the Aadhar card

Step-3: Enter the Email Address, which is a mandatory filed, to check the mails referred to the status of the application

Step-4: Enter the Mobile Number, which is a mandatory filed, to check the messages referred to the status of the application

Step-5: Enter the pin code of the area which you are located and available same on the Aadhar card

Step-6: Select the Village / Town / City from the dropdown

Step-7: Select the Main Category from the dropdown

Step-8: Select the Category from the dropdown

Step-9: Enter the Security Code in the Text Box which is given in the Captcha Image

Step-10: Enter the remarks in the Text Box, which it should not exceed to 150 characters

Step-11: Click on the Submit Button

Step-12: After click on Submit, a Case Id will be generated and sent to your mobile number and Email-id

for voice complaint people have to dial toll free number 1947


Check Aadhar Complaint Status Online

How to check my aadhaar complaint Status:
aadhaar card Complaint Status

The Unique Identification Authority of India (UIDAI) has provided the facility to address your complaints and suggestions. All your valuable suggestions will be considered and efforts will be made to ensure that all your queries and complaints are removed as quickly as possible. An individual who has enrolled for Aadhaar gets an acknowledgement slip. The details printed on that acknowledgement slip can be used to properly explain your problems.
We can check Aadhaar complaint status in two methods

File Complaint Application through Online
Status of the File Complaint Application offline

The following are the fields are entered to check the status of the File Complaint Application through Online:
Step-1: Enter the Case Id which is generated to your Mobile number and Email-id
Step-2: Enter the Security Code in the Text Box which is given in the Captcha Image
Step-3: Click on the Check Status Button
Step-4: The status of the Application will come to your email-id and SMS to the registered Mobile Number
The following is the offline Method to check the status of the File Complaint Application:
For any query or complaint, you can contact through any of the means provided below:
Telephone Number: 1800-300-1947 (Toll-free)
Fax: 080-2353 1947
Mailing Address:
PO Box 1947, GPO Bangalore – 560001
Email Address: help@uidai.gov.in
Address: Unique Identification Authority of India (UIDAI),
Planning Commission,
Government of India (GoI),
3rd Floor, Tower II, Village / Town / City
Jeevan Bharati Building,
Connaught Circus,
New Delhi – 110001.


What is Aadhaar Seeding Benefits of Aadhaar Seeding


Aadhaar Seeding

What is AADHAR SEEDING :
Aadhaar Seeding is a process whereby UID is added to the database of beneficiaries.
In simple words, each beneficiary is identified by beneficiary number (such as Job card number and UID).
As a result, the database of beneficiaries contains the details of beneficiary such as name, beneficiary identifier no (such as job card no, pension no etc), and UID.
Benefits of Aadhaar Seeding
• For the Government (or any other agency offering services or benefits), seeding of UID number in beneficiary database servers to uniquely identify its beneficiaries.

• When each of the beneficiaries is uniquely identified, the database of beneficiaries can be cleansed of:

a. all beneficiaries who are non-existent ( as non-existent persons cannot get UID)

b. of all beneficiaries who are claiming the benefit more than once as a UID can occur only once in the database and one person can have only one UID

c. Of all beneficiaries who are claiming benefits in the names of others. Such persons will not be able to authenticate themselves

• This ensures that Government has a robust and clean database.

People can check Aadhaar seeding Status,   aadhaar seeding by pin code, aadhaar seeding EPIC, aadhaar seeding System.


What is Aadhar URN How to know my Aadhar URN Status


aadhaar URN meaning, status

What is aadhhar URN Number and meaning?
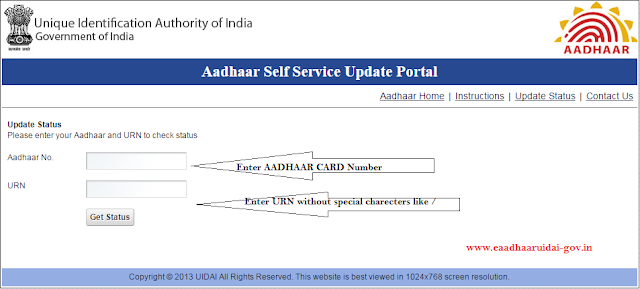
Aadhar card Unique Request Number - URN to know the e-Aadhar Card Status online, by filling the details of Aadhaar card Number and URN number on the Self service Update portal- ssup

Aadhaar card has many mistakes in printing, for this UIDAI has made online portal to correct or update your aadhaar details,

 When you make changes to your aadhaar card data, a unique request number (urn) is assigned to that change request.

Keep this number safe, so that you can track the update status online

How to know my Aadhar URN
• Collect the required documents of correction, such as name, age, gender, address.

• Go to this link aadhaar online update portal.

• After that you will see the two boxes, first box is for aadhaar number and second is phone number which you have registered.

• You will get the OTP after putting the required details; just enter the mobile number OTP,

        Note: that OTP is valid for only 15 min

• After this, next step is which you want to update, just click on the box, it might be name, age, sex, address.

• After successfully uploading document you will get the aadhar URN Number (update request number).

• Just save that number, it will be helpful in tracking the update status online


Friday, 19 February 2016

SSUP- Aadhar Self Service Update Portal ssup.uidai.gov.in

Aadhar Self Service Update portal

Aadhaar SSUP - Self Service update portal:
Unique Identification Authority of India has launched an online portal that is Aadhaar Self Service Update Portal (ssup) which makes things easier, faster and more convenient for the users. Now through this portal candidates can not only do Adhar card update status check but can also change their Name, Surname, D.O.B etc.
Aadhaar card is a 12-digit individual identification number that is given to each and every citizen of India by Unique Identification Authority of India (UIDAI) on behalf of Government of India.
There are two methods in which you can update your aadhaar details on Aadhaar Self Service Update Portal one of which is through online procedure and the other is through post.

For ONLINE Submission:
The following are the steps for the online submission:

Step – 1: First, go to the aadhar official website home page by entering
URL: https://ssup.uidai.gov.in/update

Step-2:If you have registered mobile number with Aadhaar, enter your Aadhaar Number to get an OTP (One Time Pin) at that mobile.

Step-3: Enter OTP which you received to your mobile and Captcha to login to the Update Portal.

Step-4: Data Update Request section will be opened on this same page.

Step-5: Select the fields you want to be updated /corrected. You can select more than one information to update in Aadhaar.

Step-6: And click on the Submit button

Step-7: Then online application form will be opened. In this section you can fill the form with required information and click on the submit update request

Step-8:You confirm that you have read the instructions carefully and the information provided by you to the UIDAI and the information contained herein is true, correct and accurate and click on the proceed button

Step-9: Update Request Confirmation and Document Upload page will be opened

Step-10: In this section you have to upload self attested copy of a valid proof, here you can upload and submit

Step-11: Select BPO Service Provide and submit request, then a message will see on the page like, "your update has been successfully submitted on today.

Step-12: Note down your Update Request Number (URN) carefully for future reference and tracking. You can also download /Print your Update Request copy

For Submission through POST:
Step-1: Download the Aadhaar update/correction form.Clickhere.Find details here.

Step-2: Fill in the form correctly and mention Correct Mobile Number. Mobile number is mandatory for applications via post.

Step-3: Based on the fields you have updated /corrected attach Self attested (self-signed) supporting documents as per List of Valid documents.

Step-4: In case child is below 5 years parent/guardian should sign on the documents.

Step-5: Mention Aadhaar Number and type of document (PoI/PoA/DoB) on all the scanned copies attached.

Step-6: Label the envelope as “Aadhaar Update/Correction” on top and seal it properly.

Step-7: Send the envelope to one of the below addresses.

Address I
UIDAI
 Post Box No. 10,
Chhindwara,
 Madhya Pradesh - 480001,
 India
Address II
UIDAI
Post Box No. 99,
Banjara Hills,
Hyderabad - 500034,
 India
Note: For the process of Corrections update it will takes Hardly 60 Days , with in 60days it will be updated, and SMS alert will come on your register mobile Number, Your Request was processed now you can download your e-aadhaar card from the official website,

this is the process to update the aadhaar information through self Service updtae portal ssup, 

Wednesday, 10 February 2016

How to link aadhaar Card to EPFO and UAN account www.epfindia.com

Link aadhaar card to EPFO and UAN Account

How to link Aadhaar card to EPFO and UAN Account
As per the government’s instructions, all the three services provided by Employee’s Provident Fund Organization (EPFO) i.e. Life Insurance, Provident Fund as well as Monthly Pension has to use the Aadhaar card platform for offering its services to the respective beneficiaries.

The Officials of PF department that all the employees who are using EPFO scheme will have to immediately links their unique Aadhaar numbers with their respective bank accounts.

This scenario shows that as per the government’s decision, all the beneficiaries of such schemes will have to ultimately link their bank accounts with their unique identity numbers (UAN)

This decision made by the government has somehow worried the officials of the EPFO. Now EPFO is providing all the benefits to the deserving beneficiaries directly into their respective bank accounts.
The EPFO is providing this payment to around 85% of the beneficiaries through NEFT i.e. National Electronic Funds Transfer program.

In order to upload KYC information in UAN portal, the following documents are mandatory:
1. Copy of the self-attested PAN Card

2. Copy of the canceled cheque leaf of your Bank Account (all bank details should be available, account number, IFSC code, and beneficiary name)

3. Copy of the self-attested Aadhaar Card.

The following are the steps to be followed for the upload of the Aadhar for the EPFO
Step1: Log into www.epfindia.com. As shown below, 
Click on Image for Zoom

link aadhaar Card to EPFO and UAN account


 Step 2: On the epfindia page go to “For Employees” as highlighted below

link aadhaar Card to EPFO and UAN account


Step 3: Once you click on for employees, you will have to go to Services under that “UAN Member e-Seva.”

link aadhaar Card to EPFO and UAN account


Step 4: Once you click on UAN Member e-Seva. The below page will appear.
Here you will have to login in with your UAN No and Password.

link aadhaar Card to EPFO and UAN account


Step 5: Once you have logged in with your UAN No & Password, go to “Profiles” under that “Update KYC information.” As given below.

link aadhaar Card to EPFO and UAN account


 Step 6: Once you have entered the KYC information on the Page, you will see the below screen
Here you will put in your PF No; in the current member ID box, as shown below:
Then select the KYC, below is the set of documents which needs to be self-attested and uploaded
Aadhar card, Pan Card and Bank account number soft copies need to be uploaded which are compulsory

link aadhaar Card to EPFO and UAN account


Step 7: After uploading the documents, the details will be in Q for approval, and check the status after 15 days.

Step 8: The below screenshot is an example shown after approval from the employer.


link aadhaar Card to EPFO and UAN account
We conclude before link your aadhaar Number to EPFO account and UAN account; we need to activate both the accounts, and all the Employees Public Sector and Private Sector, link their aadhaar  card Number to EPFO and UAN accounts before March 31st.

UAN Status- How to Check Universal Account Number Status

Universal account Number Status

How to check the status of UAN

People can check their Universal Account Number Status after UAN Activation process completed only, before checking UAN Status employees may Activate their UAN Number, from the Activation page,   EPFO has launched an Universal Account Number (UAN) based Member Portal to provide a number of facilities to its members through a single window

• Activate your registration to avail various facilities such as UAN card download, member passbook, updating of KYC information etc.

• As of now, only active members (contribution received through ECR for the wage month October 2013 onwards) would be able to register themselves.

• For registration, obtain UAN from your employer along with your member ID.

• Your mobile number would be required to activate registration.

The following are the steps to check the status of UAN

Step-1: Select the state from the dropdown

Sep-2: Select the office from the dropdown

Step-3: Enter the PF Account no


Step-4: Click on the Check status

Click here for UAN Status Page

We conclude that employees have to go UAN members page http://uanmembers.epfoservices.in/ to check the Universal Account Number Status, after UAN Activation process.

Useful Information

What is UAN 
UAN Activation Process
UAN Benefits and features


What is UAN - Activation Features Benefits of Universal Account Number

What is UAN Number Features and Benefits

UAN activation

UAN stands for Universal Account Number. The UAN will act as an umbrella for the multiple Member Ids allotted to an individual by different establishments. The idea is to link multiple Member Identification Numbers (Member Id) allotted to a single member under single Universal Account Number.

This will help the member to view details of all the Member Identification Numbers (Member Id) linked to it. If a member is already allotted Universal Account Number (UAN) then he / she is required to provide the same on joining new establishment to enable the employer to in-turn mark the new allotted Member Identification Number (Member Id) to the already allotted Universal Identification Number (UAN).

Members need to visit the UAN based Member Portal website i.e. http://uanmembers.epfoservices.in
Initially, member will have to activate his UAN by selecting a link given ‘ACTIVATE YOUR UAN’ on the Member Portal. Member should have UAN, Mobile and Member ID readily available to activate his/her UAN on the Member Portal. For further details, please select the hyperlink ‘User Manual for Member’ 

people can see below the details of
Features of Universal Account Number
Benefits of Universal Account Number (UAN) To the Employee
How EPFO Give Universal Account Number

Features of Universal Account Number
  • An employee will get only one universal account number
  • You will have same UAN in different jobs within the country
  • Change jobs as much as you want the EPF will follow you. (Few of us get this chance )
  • This number would be attached to your identity.
  • The KYC documents would be used for authentication of the universal account number.
  • The EPFO portal will issue the UAN. Employers will give these to the employees.

Benefits of Universal Account Number (UAN) To the Employee
  • You can link all of your previous PF account at one place.
  • EPF Transfer would become very easy. It can be done automatically.
  • EPF balance from all of the account would be transferred automatically.

You can easily check and download your PF passbook any time.
  • Employer could not blackmail you because of the EPF. He would not be able to withhold the PF of an employee.
  • In future there would be no need of verification from the employer at the time of PF withdrawal or transfer.
  • You can easily take loan from the PF account. The process would be online soon.
  • You can update your personal details online.
  • You will get monthly SMS update of PF contribution. You will get to know whether your company is depositing PF on time or not. There are many companies which delay in EPF contribution.


How EPFO Give Universal Account Number
There are two types of the EPFO to give the UAN
  1. For existing Employees
  2. For New Employees

The following are the Steps for Existing Employee:

Step-1: EPFO itself has allotted the universal account number of all the contributing members.

Step-2: Employers download these universal account numbers of its employees.

Step-3: EPFO has directed the employer to tell the new universal account number to every employee.

Step-4: Further employer would upload KYC details of the employee.

Step-5: An employee can also upload his KYC. Then employer needs to verify it.

The following are the Steps for New Employee:

Step-1: The employer submits the first PF contribution of new employees.

Step-2: These new members without UAN will be intimated to the employer through the OTCP 
(Online transfer claim portal).

Step-3: The employer has to fill the details of these new employees in the OTCP. The employer would also fill UAN of the employee, if she has any.

Step-4: If the employee doesn’t have UAN previously, then the employer can generate the new UAN for him through the portal.

Step-5: If the employee has the UAN, then the employer has to verify it from the previous employment. The new employer can view the details of previous employment through the OTCP using UAN. After verification of personal detail the employer approves existing UAN for the employee.

Step-6: In the next step employer uploads the copy of KYC documents.

For Activation of UAN based Registration employee has to visit the ACTIVATE YOUR UAN BASEDREGESTRATION page, for new registration then fill the details like UAN Number , Mobile number State,  office, then generate PIN , PIN number Will comes on Mobile

We conclude this the above description is the main Information of   UAN – Universal Account Number, from the above information readers may aware of Universal Account Number Features and Benefits  and how to create UAN for new employees / how to register for UAN for new employees,  how it useful to the employees both Public Sector and private sector. 

People May Know
Check Universal Account Number Status
How to link Aadhaar Number to EPFO and UAN


Monday, 8 February 2016

E-Aadhaar Enrollment Process | Enrollment Centers list

Aadhaar Enrollment Process

E-aadhaar enrollment process

• Go to any authorized Aadhaar enrollment center anywhere in India with your identity and address proof.

• If your locality is not listed in the online appointment application website, you will have to walk-in at any nearby Aadhaar card center, without prior appointment.

• You can get free Aadhaar card application form(s) at the center itself, or you can choose the option download in online.

• It is advisable to download, take a print out and go to the Aadhaar card center with the already filled application form(s) to save time at the center.

• At the time of enrollment, your photo, finger-prints and iris scan will be taken.

• Review carefully the details you have provided and make corrections, if any, during the enrollment itself.

• During enrollment, you will receive an acknowledgment slip, till the time you don't receive your original Aadahar Card copy.

• The information details will be verified centrally before you are issued Aadhaar Card.

• On successful verification, you will first receive an SMS and/or email notification and later after a 
few days your Aadhaar number will be printed and sent to your address through post


Eaadhaar Enrollment Process

• Go to the link https://appointments.uidai.gov.in/ where you will get the appointment form online. Search Enrollment Centers

• Fill in the details .e. name, email and phone number.

• Please note that phone number filled here will be used further if you need to do any kind of amendment online and we would recommend filling these details carefully, otherwise it will cause other troubles before you can get the aadhar card.

• Once you fill the person details you can select the Enrollment center and the date and time of the appointment online.

• It is a must for you to visit one of the aadhar centers in order to register for the card irrespective of whether you obtain your form online or from an aadhar Enrollment center.

click on the link for E aadhaar card enrollment : E-adhar Enrollment

Saturday, 6 February 2016

Adhar Card: What is Adhar card Eligibilities to get adhar card

What is adhar card?

• Adhar card is a 12 digit singular Id number issued by the Unique Identification Authority of India for the Government of India

• This number will serve as a proof of personality and address, anywhere in India.

• Adhar card is the instantly verifiable national identification number assigned to residents of India.

• It is not a proof of citizenship.

• It only guarantees identity; not rights, benefits or entitlements.

adhar card Enrollment process


• Adhar card program is operated by the Unique Identification Authority of India (UIDAI), an 

authority of the Government of India. It was established in January – 2009 under the Planning Commission of India.

• Adhar card is expected to play the most prominent role in India Reforms from 2014 onwards.

• Any singular, regardless of age and sexual orientation, who is an inhabitant in India and fulfills the check prepare set out by the Uidai can enroll for Adhar card.

• Every distinctive need to enlist just once which is free of expense.

• Every Adhar card number will be exceptional to a singular and will remain good forever.

• Adhar card number will help you give access to administrations like managing an account, cell telephone associations and other Govt and Non-Govt administrations at the appointed time course.

Features of Adhar card:
  • Enables a person to verify his/her identity universally.
  • Can be used at multiple places to prove one's identity for opening a bank account, applying for passport and at many other places.
  • Allows deprived and needy people in accessing services like banking facilities
  • Highly effective for people residing in rural and semi-urban areas to avail the government schemes and other facilities
  • Eliminates the threat of any fraud and bogus activity.
  • Can be used in areas like employment, education, pension schemes, healthcare, insurance, property transactions, Public Distribution System, inclusion & social security.
  • MNREGA workers can receive their wages on time and directly in their accounts.
  • Used in Know Your Customer (KYC) authentication for insurance, demat account, mutual fund schemes, landline and mobile phones, vehicle purchase and new gas connections.

Eligibilities to get Adhar card:
  • Any resident of India, Non Resident Indian (NRI) or any foreign citizen residing in India is eligible to apply for Adhar card.
  • An individual of any age can apply for Adhar card number.
  • A child of age less than 3 years does not require giving biometric information and in this case Adhar card will be linked to the parents or guardian of that child. However, that child needs to give his/her bio-metric information when he is of 5 years in age.
  • For a child who has enrolled for Adhar card and is of the age of 5 to 15 years has to give his/her biometric information again when his/her age becomes 15 years.
  • This process of re-registering is necessary because the biometrics of a person changes with age.
  • The biometrics of a person will be different when he is a child and when he will be an adult.